Adobe Lightroom CC Guide
is document requires Adobe Lightroom CC 1.1. Technical instructions may dier depending on your version.
1
Edit and organize photos with Lightroom CC
Edit and organize photos
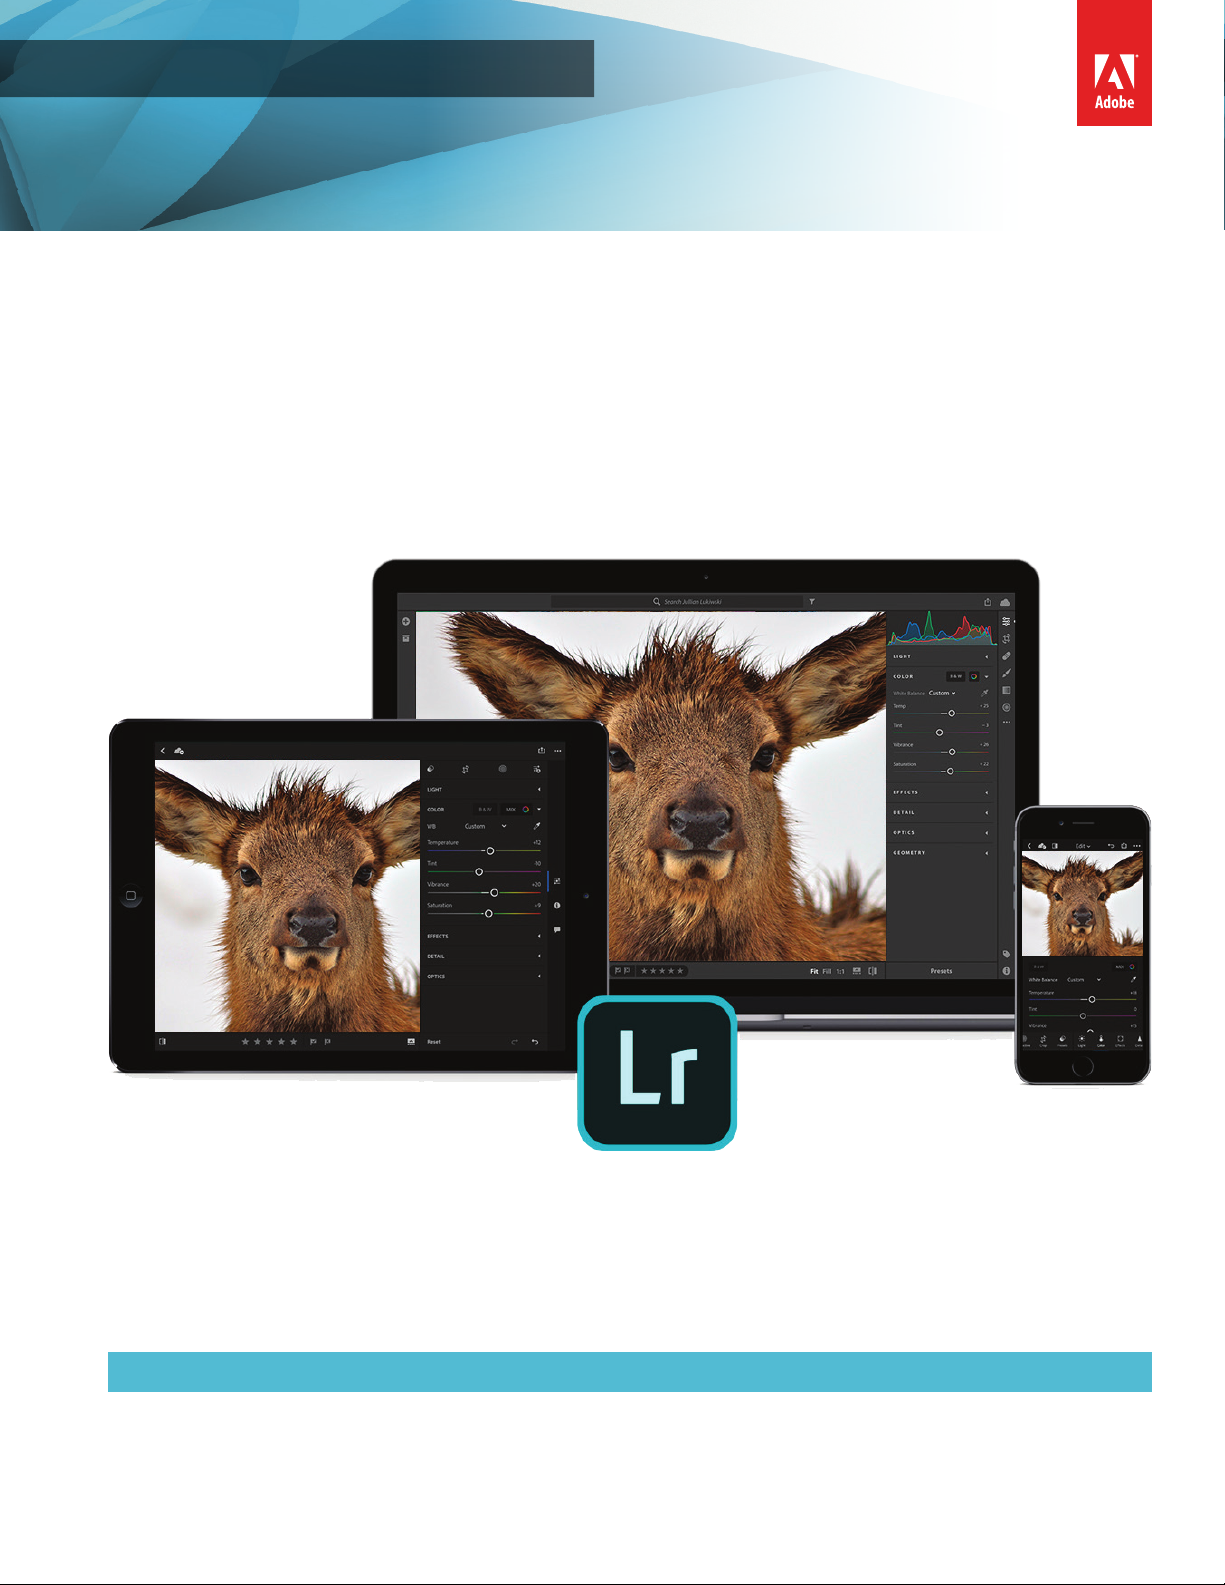
With easy-to-use sliders, filters, and quick adjustment tools, the Lightroom CC interface makes it
simple to create photos that look just the way you want. Edit your full-resolution photos at home,
school, and beyond — on mobile devices, the web, or your desktop. Organize your photos into
albums or sort by date to find them easily. Changes made on one device are automatically applied
everywhere else (Figure 1).
In this guide, you’ll learn how to edit photos in Lightroom CC using the six main editing controls—Light, Color, Effects,
Detail, Optics, and Geometry. You’ll also learn how to organize photos into albums or folders, assign keywords, and
rate and flag photos.
Using Edit controls
Using the Edit controls in Lightroom CC is easy to master. Be sure to experiment widely with the tools and options to
see how your images are affected by each of the settings.
Figure 1 Edits on one device are automatically applied to other devices
2
Edit and organize photos with Lightroom CC
© 2018 Adobe Systems Incorporated.
is document requires Adobe Lightroom CC 1.1. Technical instructions may dier depending on your version.
You can access the Edit controls in the individual photo Detail view. In the Edit panel, the edit controls are organized
under various panels that you can expand/collapse to access those controls. To help you visually understand the effect
that each of these edit controls produces in your photo, this section provides accompanying images and descriptions to
illustrate each of the editing concepts. To see these images as animations, please visit Adobe Help Edit Photos.
To begin editing a photo using any of the Edit controls:
1. Start Lightroom CC.
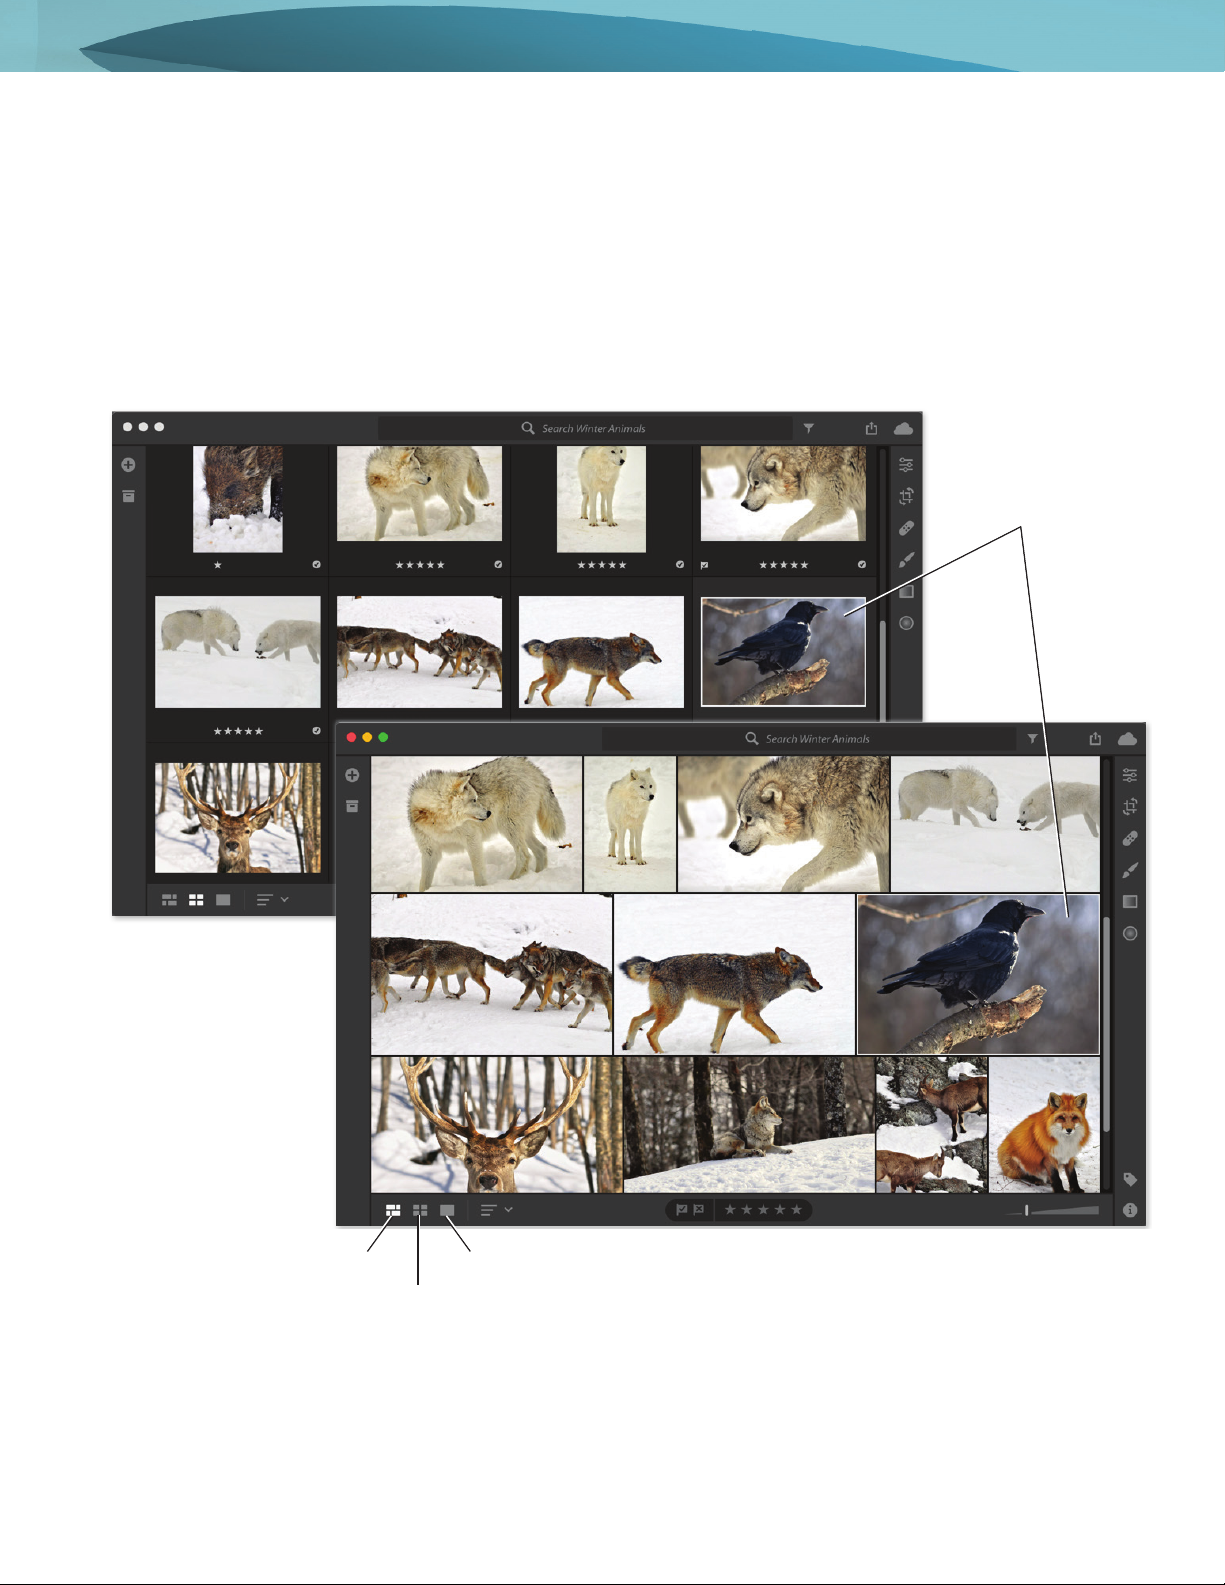
2. If you’re in Photo Grid view or Square Grid view, select the photo that you want to edit (Figure 2).
Figure 2 Square Grid view (top) and Photo Grid view (bottom)
Photo Grid view
Square Grid view
Detail view
Selected photo
3
Edit and organize photos with Lightroom CC
© 2018 Adobe Systems Incorporated.
is document requires Adobe Lightroom CC 1.1. Technical instructions may dier depending on your version.
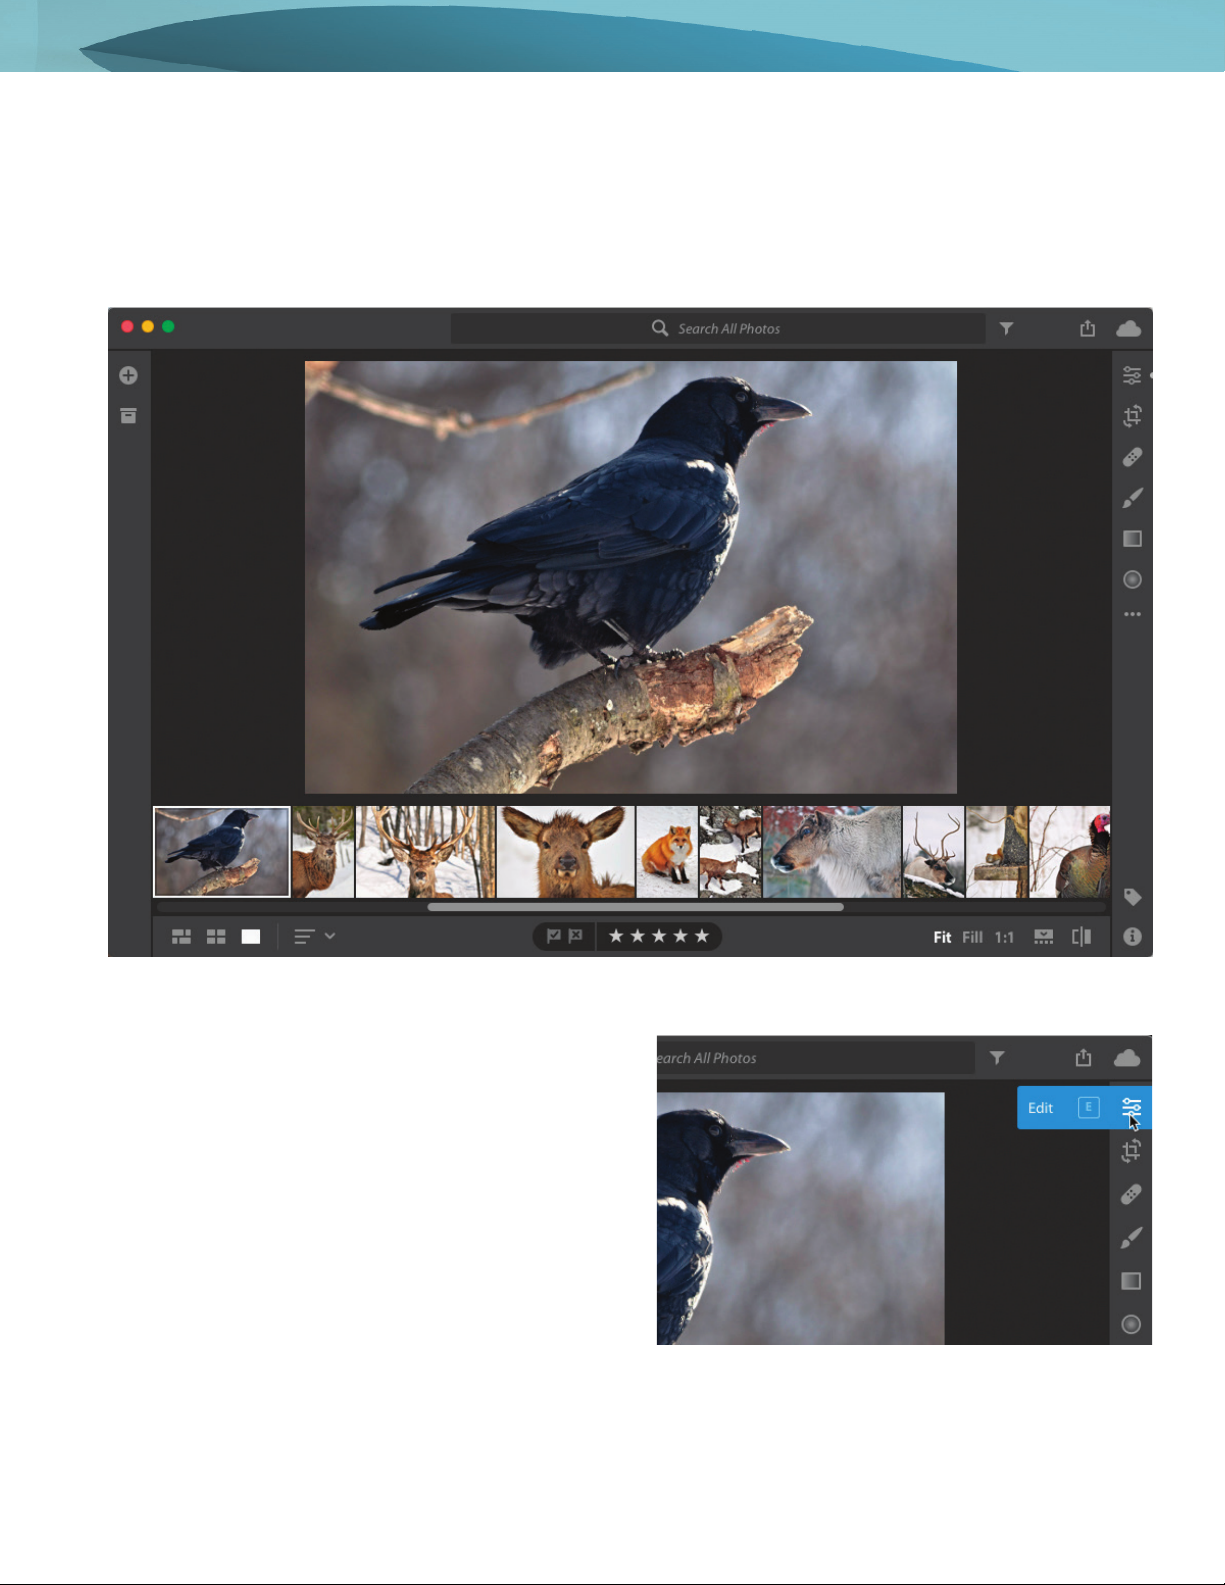
3. Click the Detail view icon in the toolbar at the boom to open Detail view (Figure 3).
If you’re already in Detail view, select the photo that you want to edit from the filmstrip appearing at the bottom of
your current selection.
Note: The Edit controls are only available in Detail view.
4. To bring up the Edit panel in Detail view, click the Edit
buon at the upper-right corner (Figure 4).
The Edit control panel opens displaying headings and
disclosure triangles for each of the Edit controls.
Figure 4 Detail of the Tools panel
Figure 3 Detail view
4
Edit and organize photos with Lightroom CC
© 2018 Adobe Systems Incorporated.
is document requires Adobe Lightroom CC 1.1. Technical instructions may dier depending on your version.
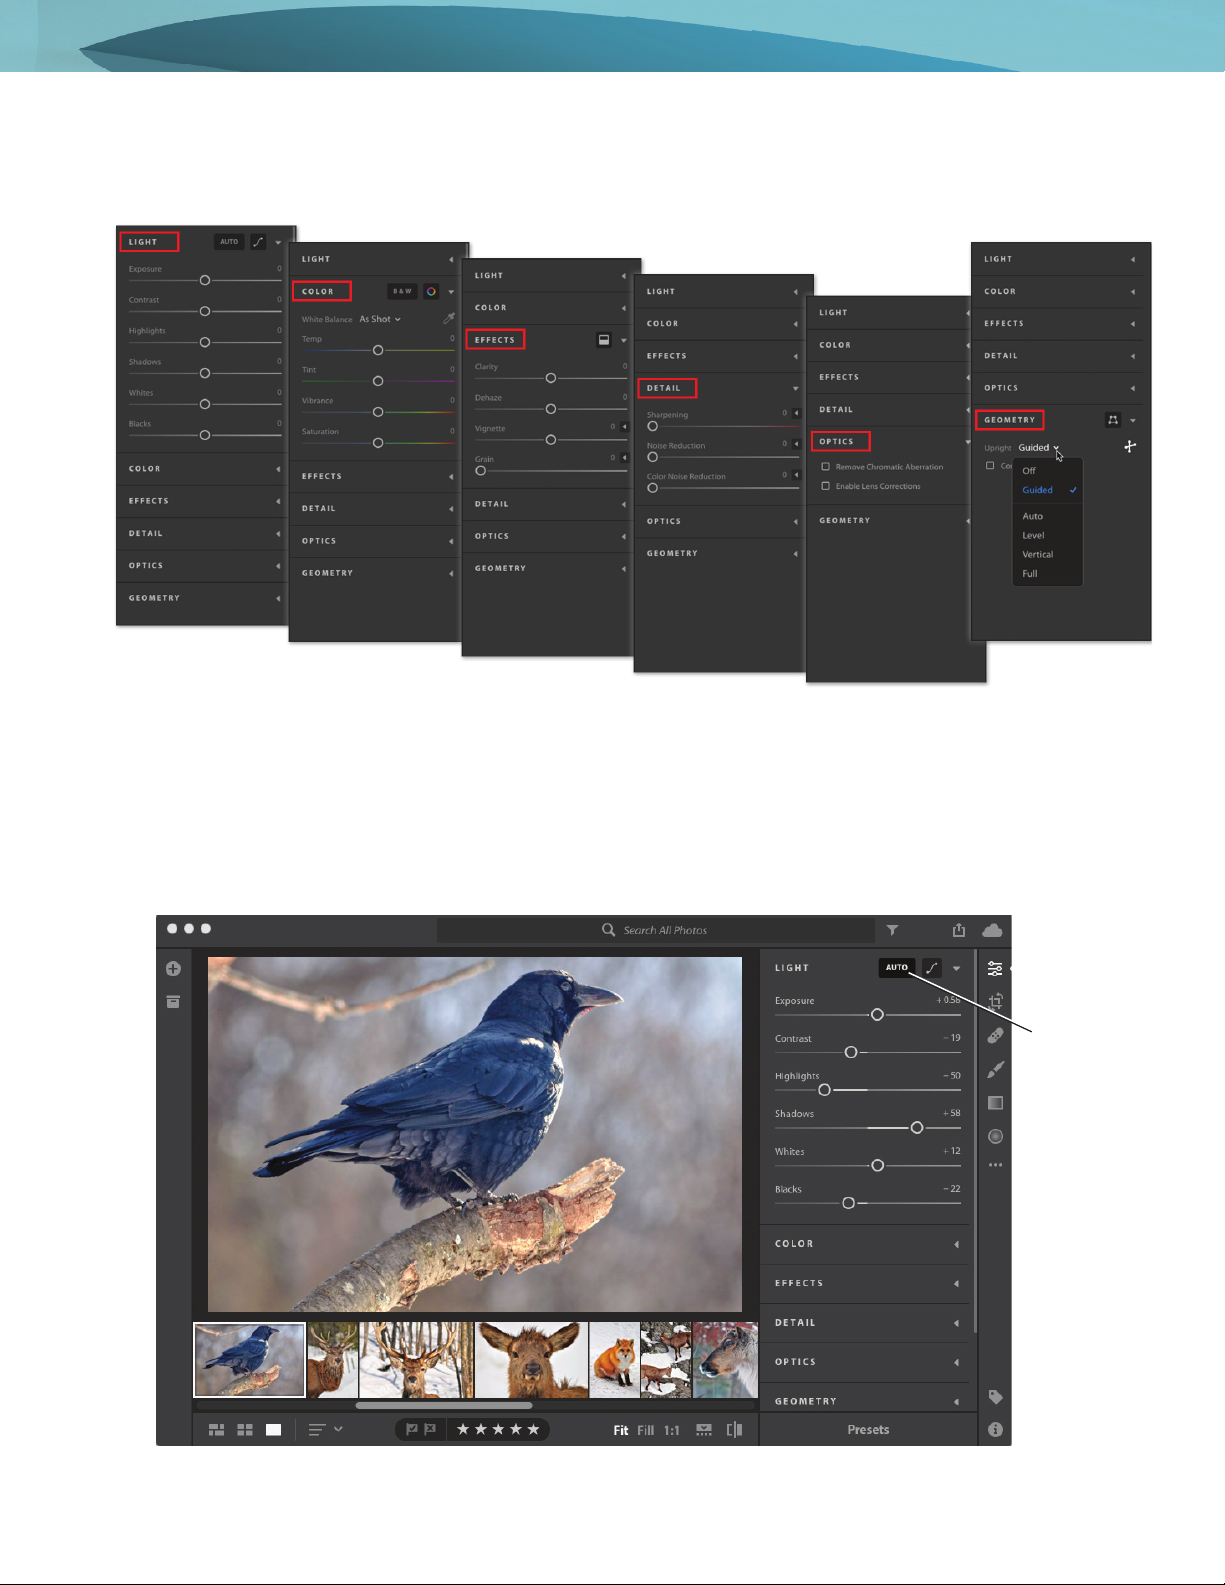
5. Expand and collapse the Edit panel to access controls organized under — Light, Color, Eects, Detail, Optics, and
Geometry and review their dierent seings and options (Figure 5).
6. Select one of the edit controls and make an edit to a photo. Some Edit controls provide automatic or advanced
options. For example, you select the Auto buon in the Light panel to automatically apply the perfect combination
of Exposure, Contrast, Highlights, and other seings to an image (Figure 6).
Be sure to experiment with all the options. Edit controls are explained in more detail in the sections that follow.
Figure 5 From left to right: Light, Color, Effects, Detail, Optics, and Geometry controls
Figure 6 Detail view and Edit controls panel
Auto button
5
Edit and organize photos with Lightroom CC
© 2018 Adobe Systems Incorporated.
is document requires Adobe Lightroom CC 1.1. Technical instructions may dier depending on your version.
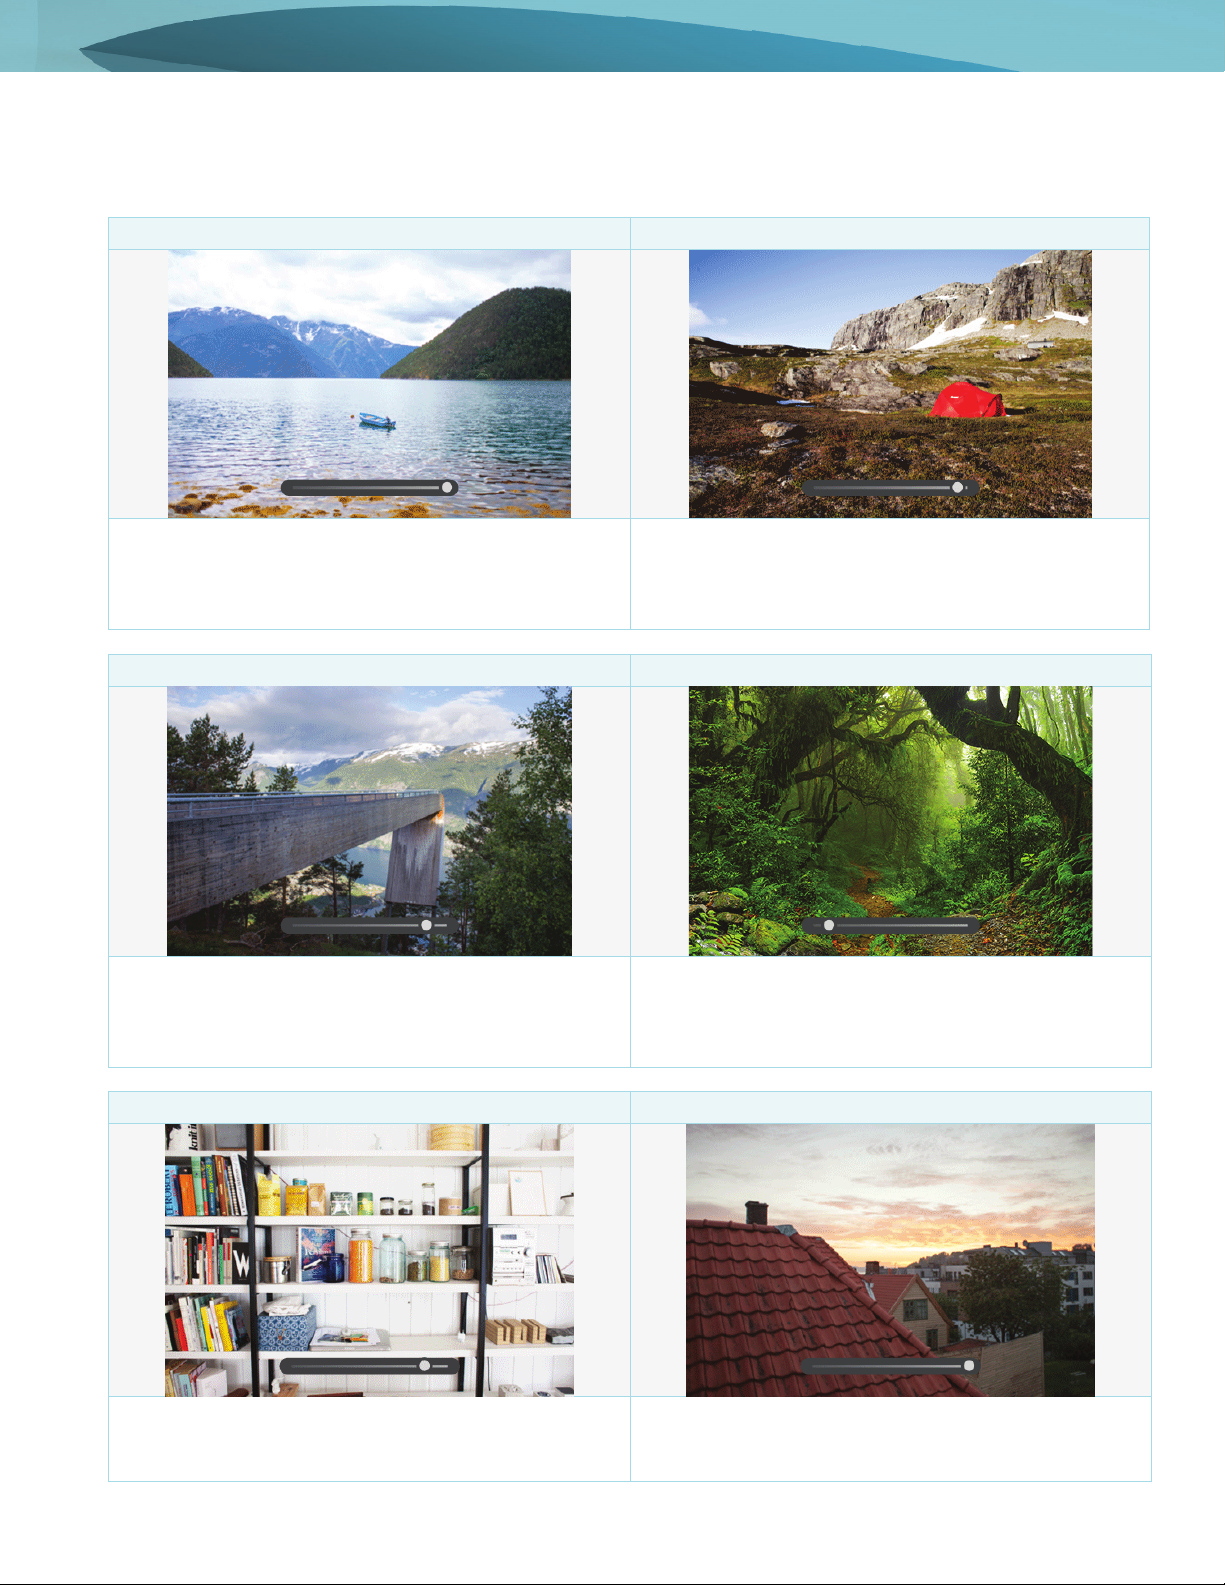
Light
Using the slider controls provided in the Light panel, you can adjust the overall tonal range of your image.
Exposure Contrast
Exposure controls the brightness of your photo. Move
the slider to the left to make the image darker; move it
to the right to make the image brighter.
Contrast determines the contrast between light and
dark colors. Move the slider to the left to flatten the
contrast; move it to the right to make the contrast more
dramatic.
Highlights Shadows
Highlights slider controls the brightness of the lighter
parts of your photo. Move the slider to the left to darken
highlights to recover details; move it to the right to
brighten them and reduce details.
Shadows controls the brightness of the lighter parts of
your photo. Move the slider to the left to deepen
shadows; move it to the right to brighten them and
recover details.
Whites Blacks
Whites slider sets the white point of the image. Move
the slider to the right to make more colors appear
completely white.
Blacks slider sets the black point of the image. Move the
slider to the left to make more colors appear completely
black.
6
Edit and organize photos with Lightroom CC
© 2018 Adobe Systems Incorporated.
is document requires Adobe Lightroom CC 1.1. Technical instructions may dier depending on your version.
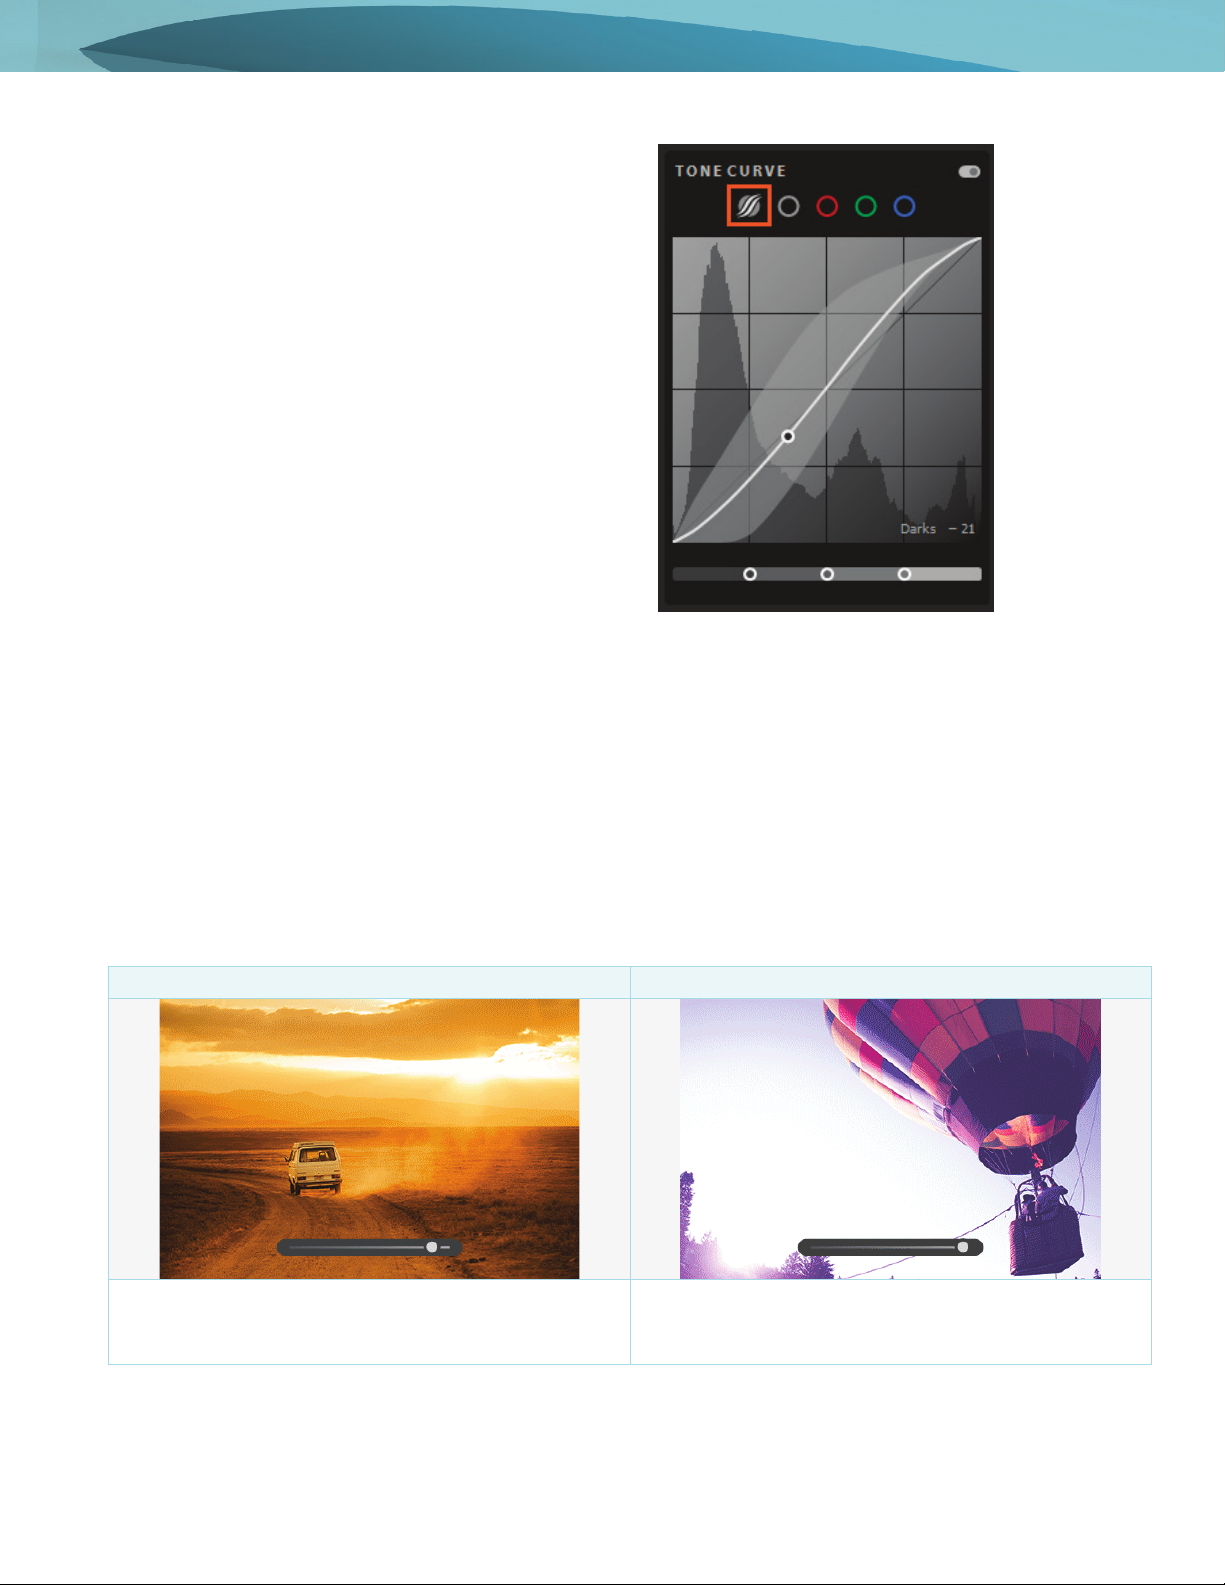
Advanced light-editing options include using the Tone
Curve (Figure 7). The Tone Curve in the Light panel gives
you greater control over the tonal range and contrast in
your photo. For more information, see Adobe Help
Fine-tune the tonal scale using the Tone Curve.
Color
Use the slider controls in the Color panel to fine-tune color in your image:
• Set White Balance by choosing a preset option or specifying a neutral area in the photo with the White
Balance Selector.
• Fine-tune the white balance using the Temp and Tint controls.
• Adjust the color saturation (vividness) using the Vibrance and Saturation controls.
• Convert the photo to Black & White using the B&W buon.
• Fine-tune individual colors using the Hue, Saturation, and Luminance (HSL) sliders.
Temp Tint
Temp determines how cool or warm the colors appear
in your photo. Move the slider to the left if colors are too
yellow; move it to the right if colors are too blue.
Tint determines how green or purple the colors appear
in your photo. Move the slider to the left if colors are too
purple; move it to the right if colors are too green.
Figure 7 Editing the Tone Curve
7
Edit and organize photos with Lightroom CC
© 2018 Adobe Systems Incorporated.
is document requires Adobe Lightroom CC 1.1. Technical instructions may dier depending on your version.
Vibrance Saturation
Vibrance increases the saturation of lower-saturated
colors more than higher-saturated colors, which can
help prevent skin-tones from looking unnatural.
Saturation boosts the saturation of all colors equally.
Move the slider to the left to de-saturate colors, move it
to the right to boost saturation.
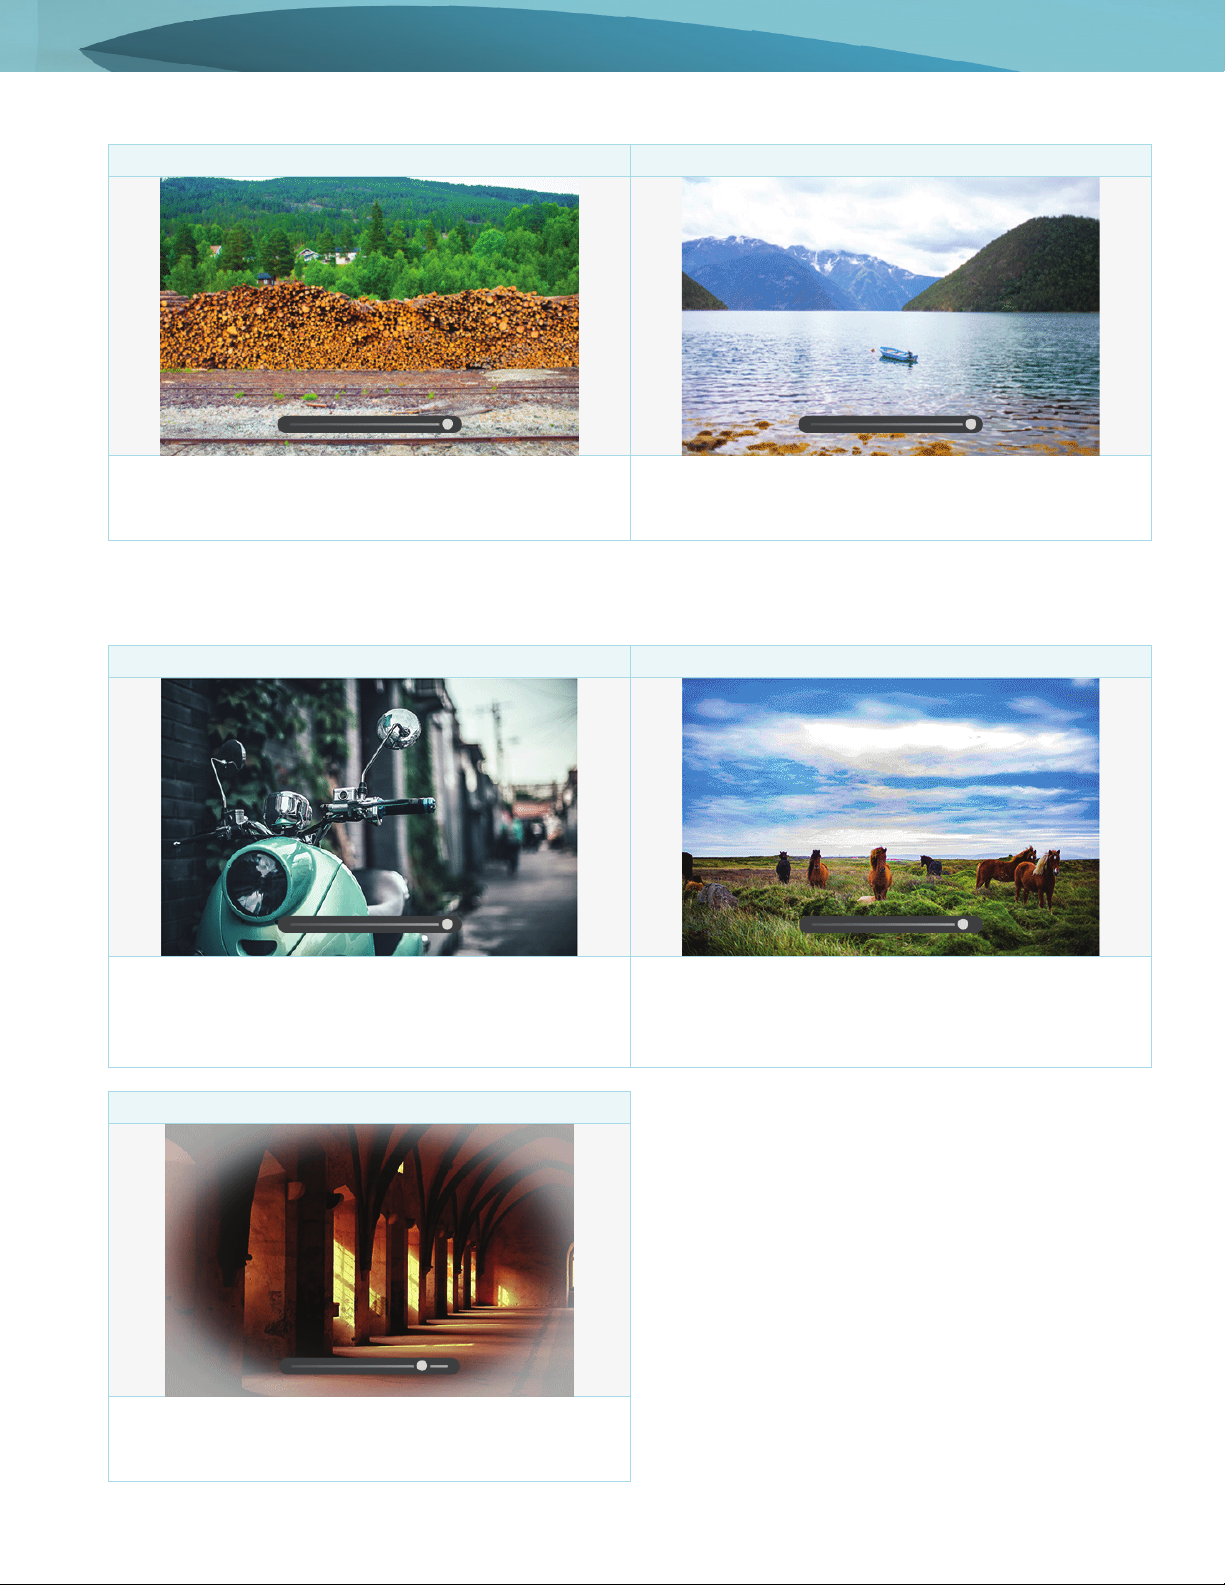
Effects
Apply effects to your image - Clarity, Dehaze, Vignette, and Split Toning.
Clarity Dehaze
Clarity changes the contrast around the edges of objects
in your photo. Move the slider to the left to soften
portraits; move it to the right to make landscapes more
clear.
Dehaze adds or removes atmospheric interference.
Move the slider to the left to add simulated haze; move
it to the right to remove haze.
Vignette
Vignette makes the outer edges of the photo lighter or
darker. Adjust the Feather, Midpoint, Roundness, and
Highlights sliders to achieve a desired effect.
8
Edit and organize photos with Lightroom CC
© 2018 Adobe Systems Incorporated.
is document requires Adobe Lightroom CC 1.1. Technical instructions may dier depending on your version.
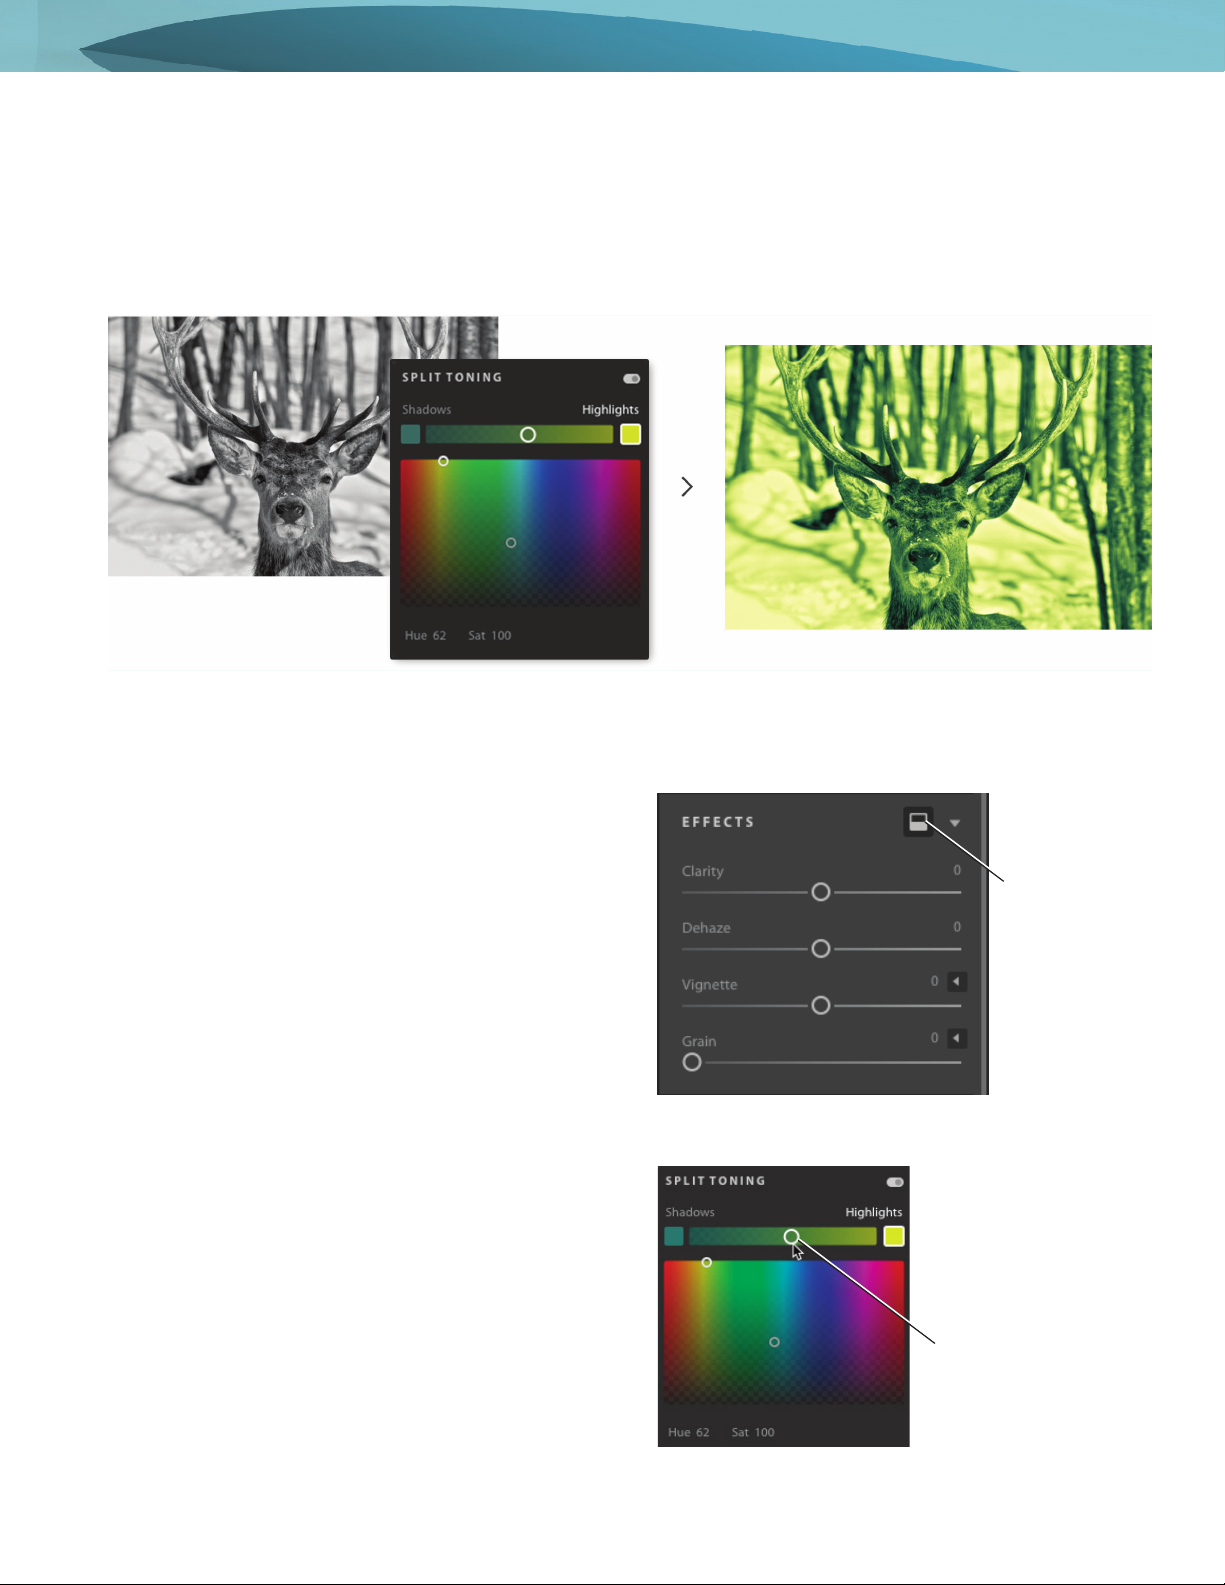
Split Toning
An advanced effects-editing option is Split Toning. Using the Split Toning controls in the Effects panel, you can create a
split tone effect in which a different color is applied to the Shadows and Highlights in your photo. For example, you can
colorize a monochrome photo or apply special effects, such as the look of cross-processed film, to a color photo
(Figure 8).
Figure 8 Split tone effect created on a monochrome image.
To create a split tone effect in your photo:
1. Open an image in Detail view that you want to add a
split tone eect.
2. In the Light seings, click the Auto buon to auto-
matically balance the image levels.
3. In the Color seings, click the B&W buon to auto-
matically convert the image to monochrome.
4. In the Eects seings, click the split tone icon
(Figure 9) to view the Split Toning controls
(Figure 10).
5. Set the Hue and Sat (Saturation) values by individu-
ally selecting the Shadows or Highlights swatches,
then dragging the corresponding controls point to
select a color in the color ramp. Note that Hue sets
the color of the tone; while Sat adjusts the intensity of
the color.
6. Set the Balance slider (Figure 10) to balance the
eect. Move the slider to the right to favor the select-
ed Highlights color; move the slider to the le to
favor the selected Shadows color.
Figure 9 Edit controls panel, Effects settings
Split Tone
button
Figure 10 Split Toning settings
Balance slider
9
Edit and organize photos with Lightroom CC
© 2018 Adobe Systems Incorporated.
is document requires Adobe Lightroom CC 1.1. Technical instructions may dier depending on your version.
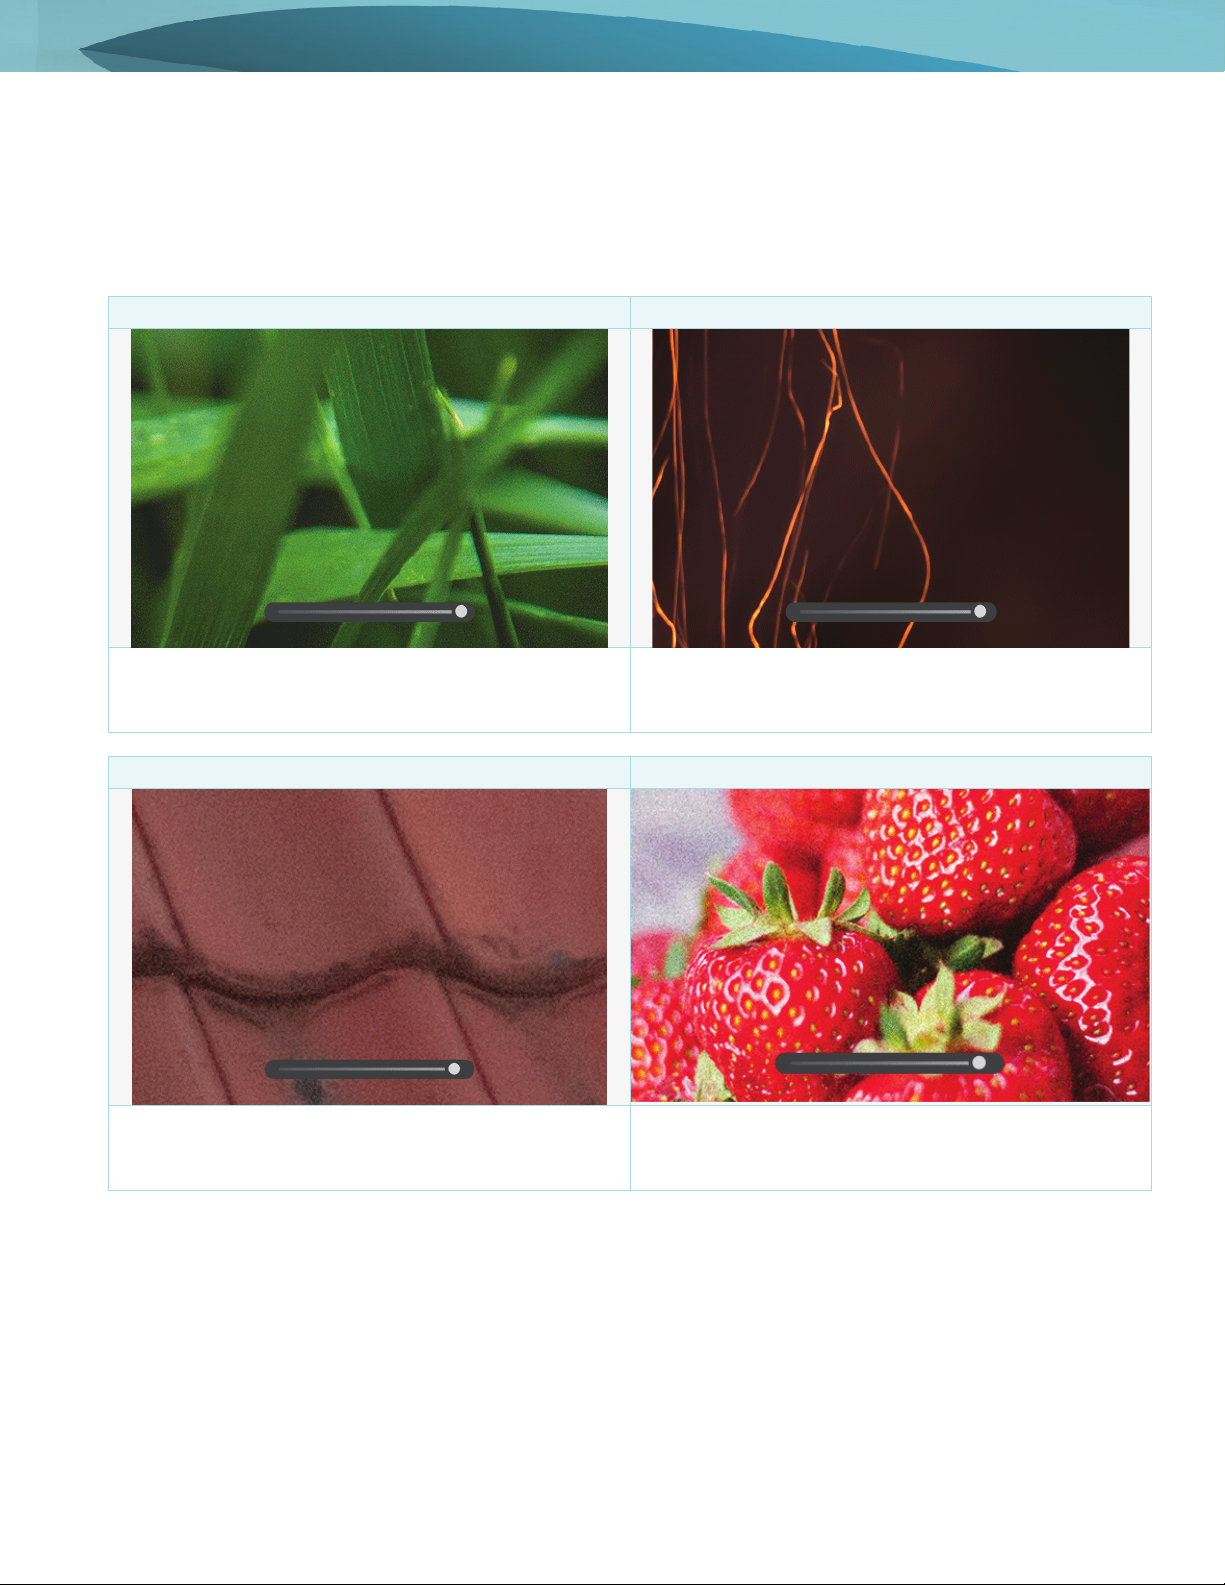
Detail
Using the slider controls provided under the Detail panel, you can sharpen your photo to enhance edge definition and
bring out detail, as well as remove image noise that can degrade image quality. Image noise includes luminance
(grayscale) noise, which makes an image look grainy, and chroma (color) noise, which is usually visible as colored
artifacts in the image. Photos taken with high ISO speeds can have noticeable noise.
Sharpening Noise Reduction
Sharpening means to sharpen details. Click the
disclosure triangle to adjust Radius, Detail, and Masking
controls.
Noise Reduction reduces luminance noise across
overall detail and contrast.
Color Noise Reduction Grain
Color Noise Reduction controls color noise and
speckled color tone smoothness.
Grain adds film grain to an image. Use controls to
change size of particles, roughness, and regularity of the
grain.
10
Edit and organize photos with Lightroom CC
© 2018 Adobe Systems Incorporated.
is document requires Adobe Lightroom CC 1.1. Technical instructions may dier depending on your version.
Optics
Camera lenses can exhibit different types of defects at certain focal lengths, f-stops, and focus distances. You can
correct and/or minimize these issues using the options provided in the Optics panel.
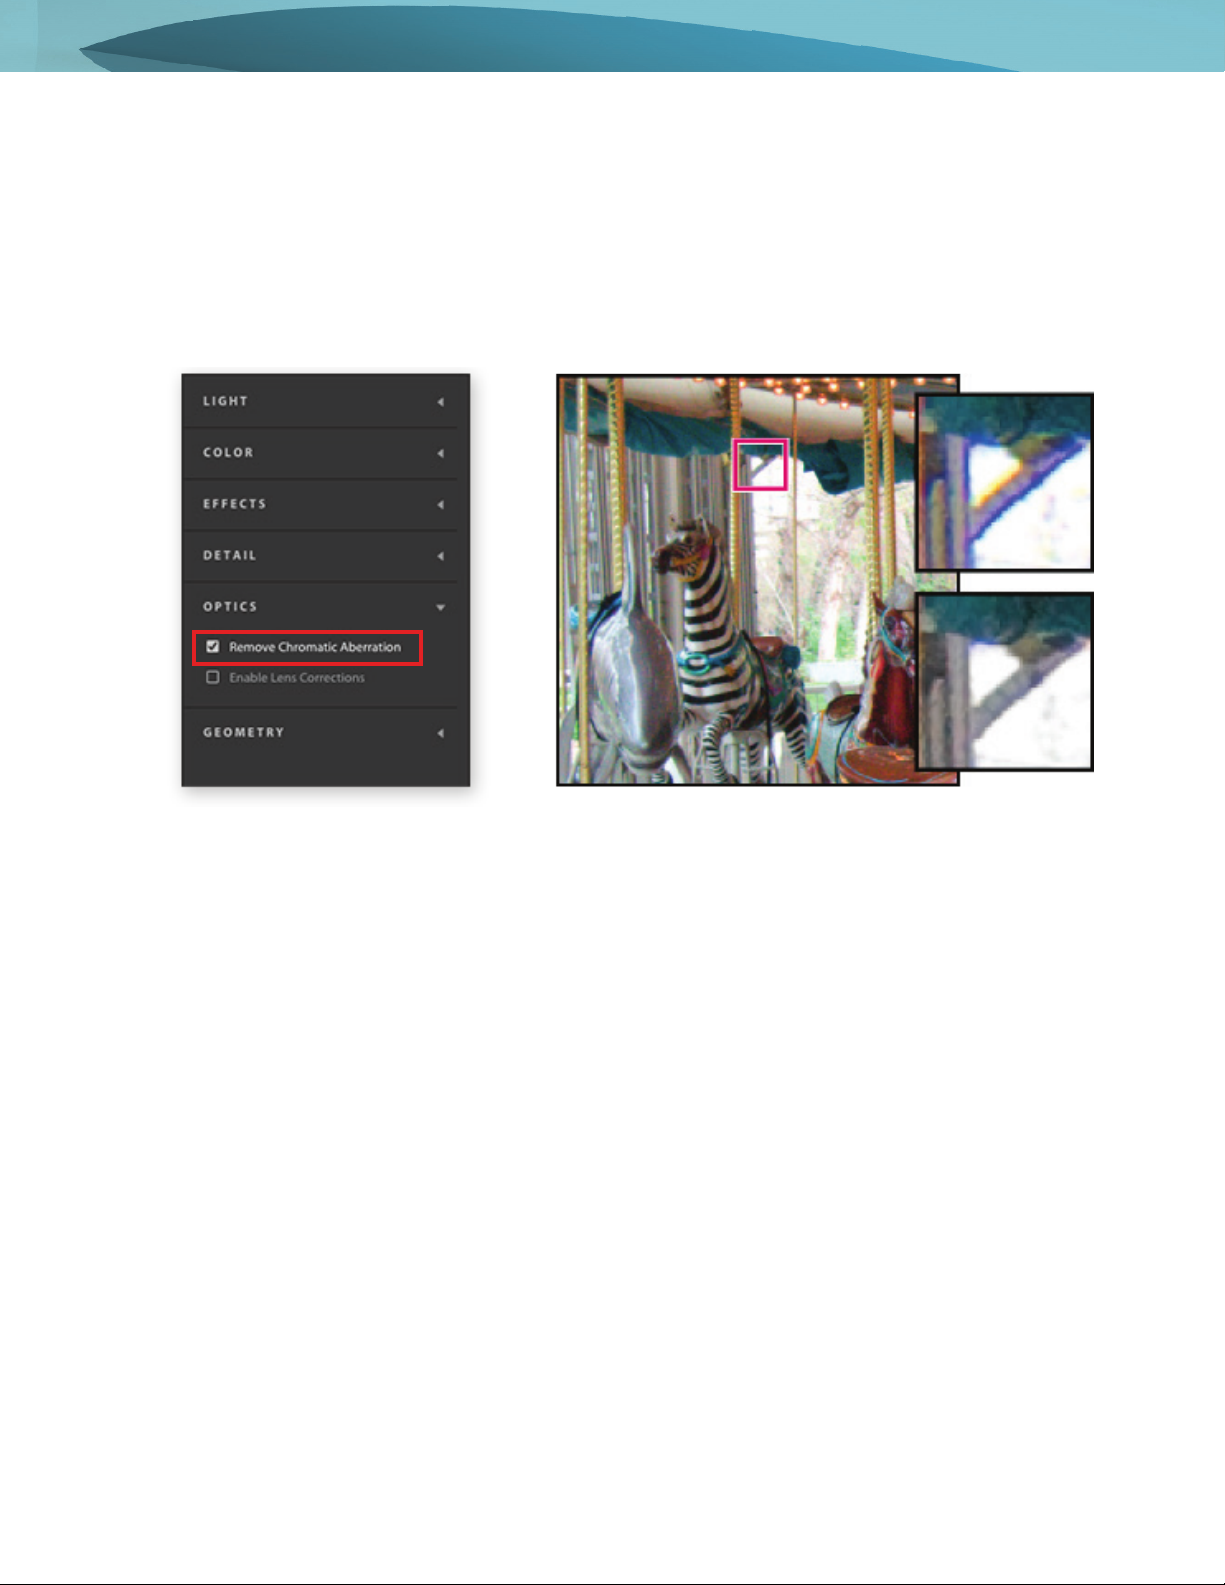
Correct chromatic aberration
Chromatic aberration appears as a color fringe along the edges of objects (Figure 11). It is caused by the failure of the
lens to focus different colors to the same spot, aberrations in sensor microlenses, and by flare.
To repair chromatic aberration:
1. Open an image in Detail view that you want to correct for chromatic aberration.
2. In the Optics seings, select the check box to automatically correct blue-yellow and red-green fringes in your
image (Figure 11).
Chromatic aberrations are removed from the photo.
Enable lens corrections
Advanced optic-editing options include using the Enable Lens Corrections setting. Lightroom CC includes numerous
lens profiles, which can be used to correct common lens aberrations such as geometric distortion and vignetting. The
profiles are based on metadata that identifies the camera and lens used to capture the photo and then compensates
accordingly. For more information, see Adobe Help Enable Lens Correction.
Figure 11 Edit controls > Optics settings (left) and original photo (center). Zoomed area of the photo with
blue/yellow fringing (upper-right), and after fixing chromatic aberration (lower right)

11
Edit and organize photos with Lightroom CC
© 2018 Adobe Systems Incorporated.
is document requires Adobe Lightroom CC 1.1. Technical instructions may dier depending on your version.
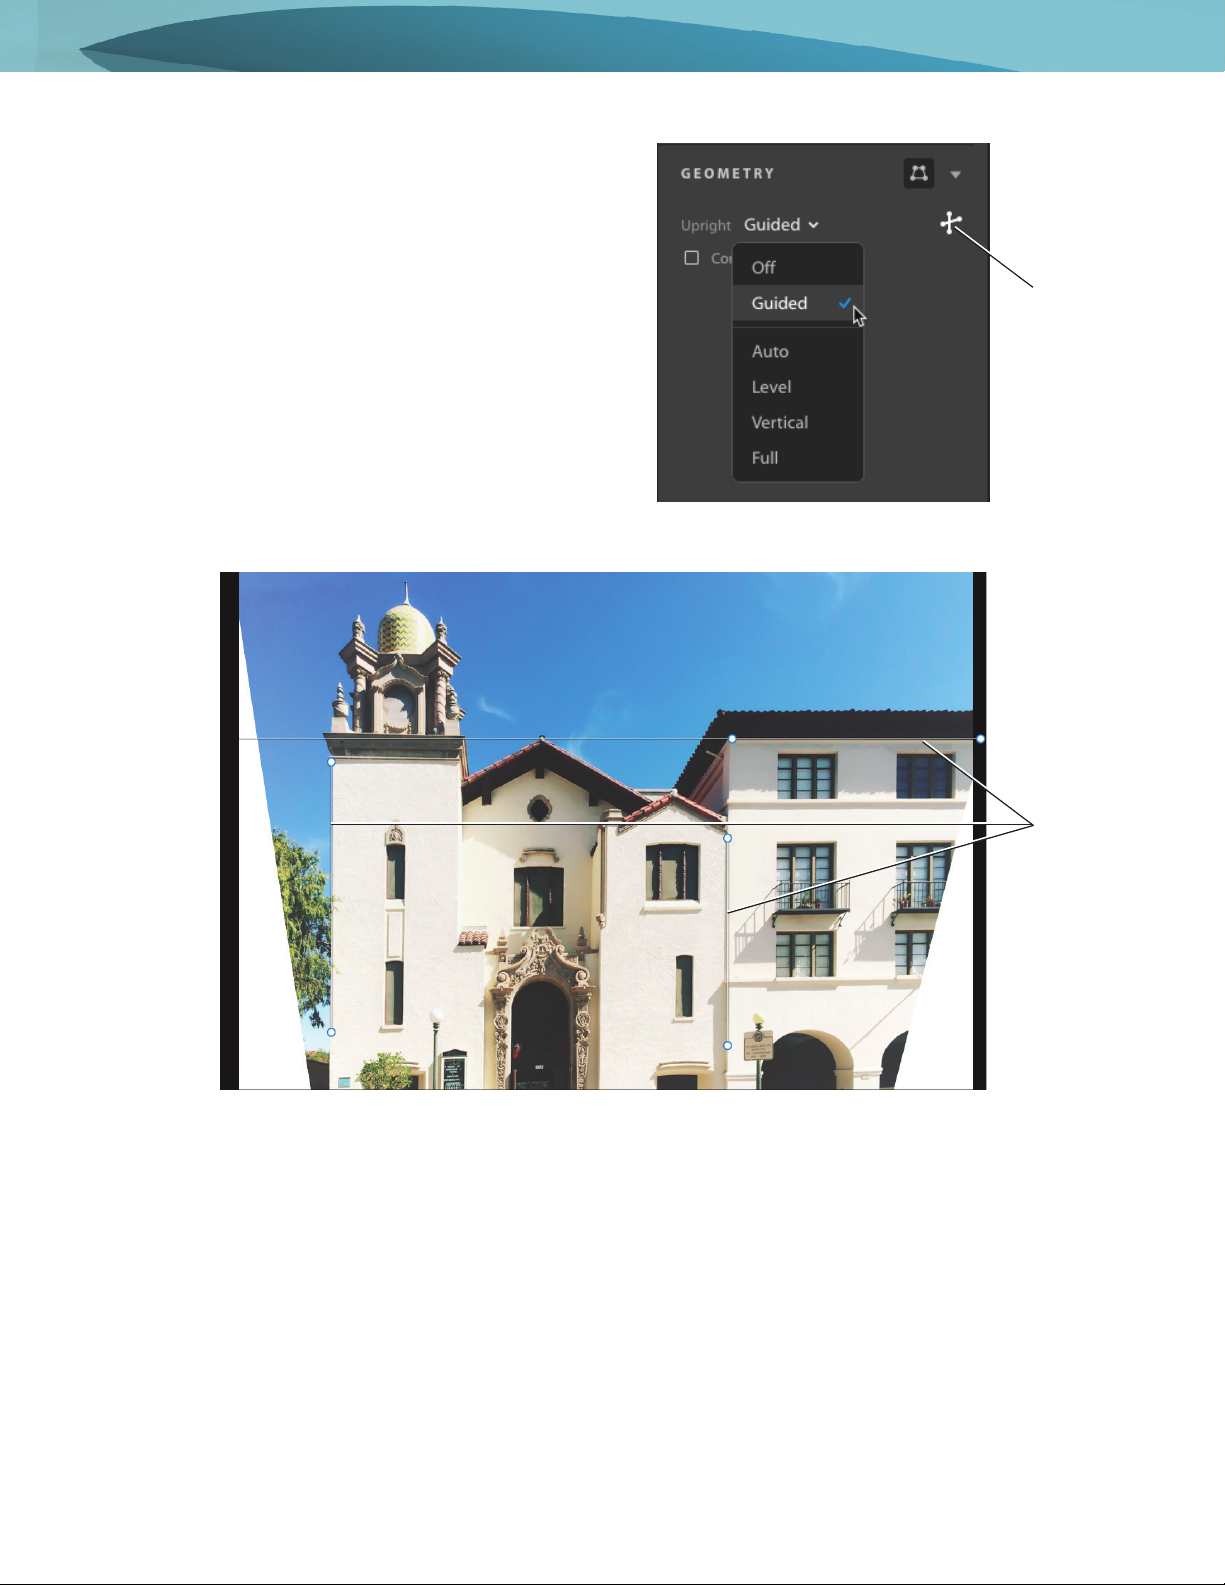
Geometry
A close distance to the subject, as well as certain types of lenses, can distort perspective and make straight lines appear
bowed, tilted or skewed in your photos. You can correct for these issues using the controls in the Geometry panel.
The Upright control provides four automatic perspective correction options - Auto, Level, Vertical, and Full, as well as a
manual Guided option (Figure 12). After applying Upright, you can refine the adjustment using the Manual Transform
sliders.
To choose an Upright mode to correct perspective:
1. Open an image in Detail view that you want to correct
for perspective.
2. (Recommended) In the Optics seings, select the
Enable Lens Corrections checkbox (Figure 13) and
leave profile settings as is.
Note: Enabling lens corrections is highly
recommended, before processing the photo with the
Upright modes.
Figure 12 Original photo with distorted geometry (left) Geometry settings (center), and image with corrected perspective
Figure 13 Edit controls panel, Optics settings
12
Edit and organize photos with Lightroom CC
© 2018 Adobe Systems Incorporated.
is document requires Adobe Lightroom CC 1.1. Technical instructions may dier depending on your version.
3. Navigate to the Geometry panel. From Upright
menu, choose an option to apply the correction to the
photo.
• Guided: Allows you to draw up to four guides on
your photo to customize perspective correction.
If you chose the Upright mode as Guided, do
the following:
1. Click the Guided Upright Tool icon
(Figure 14) and then draw the guides
directly on your photo.
2. Once you have drawn at least two guides,
the photo transforms interactively
(Figure 15).
• Auto: Corrects both vertical and horizontal perspective while balancing the overall image, preserving as much
of the visible image area as possible.
• Level: Corrects horizontal perspective.
• Vertical: Corrects horizontal perspective.
• Full: Combines all Upright correction types to automatically correct perspective.
4. Cycle through the Upright modes until you nd the preferable seing.
All the Upright modes correct and manage distortion and perspective errors. The best setting varies from one
photo to another. Experiment with the modes before deciding on the best possible mode for your photo.
Figure 14 Edit controls panel, Geometry settings
Guided
Upright Tool
icon
Figure 15 Three guides drawn over the photo using Guided Upright Tool.
Guides
13
Edit and organize photos with Lightroom CC
© 2018 Adobe Systems Incorporated.
is document requires Adobe Lightroom CC 1.1. Technical instructions may dier depending on your version.
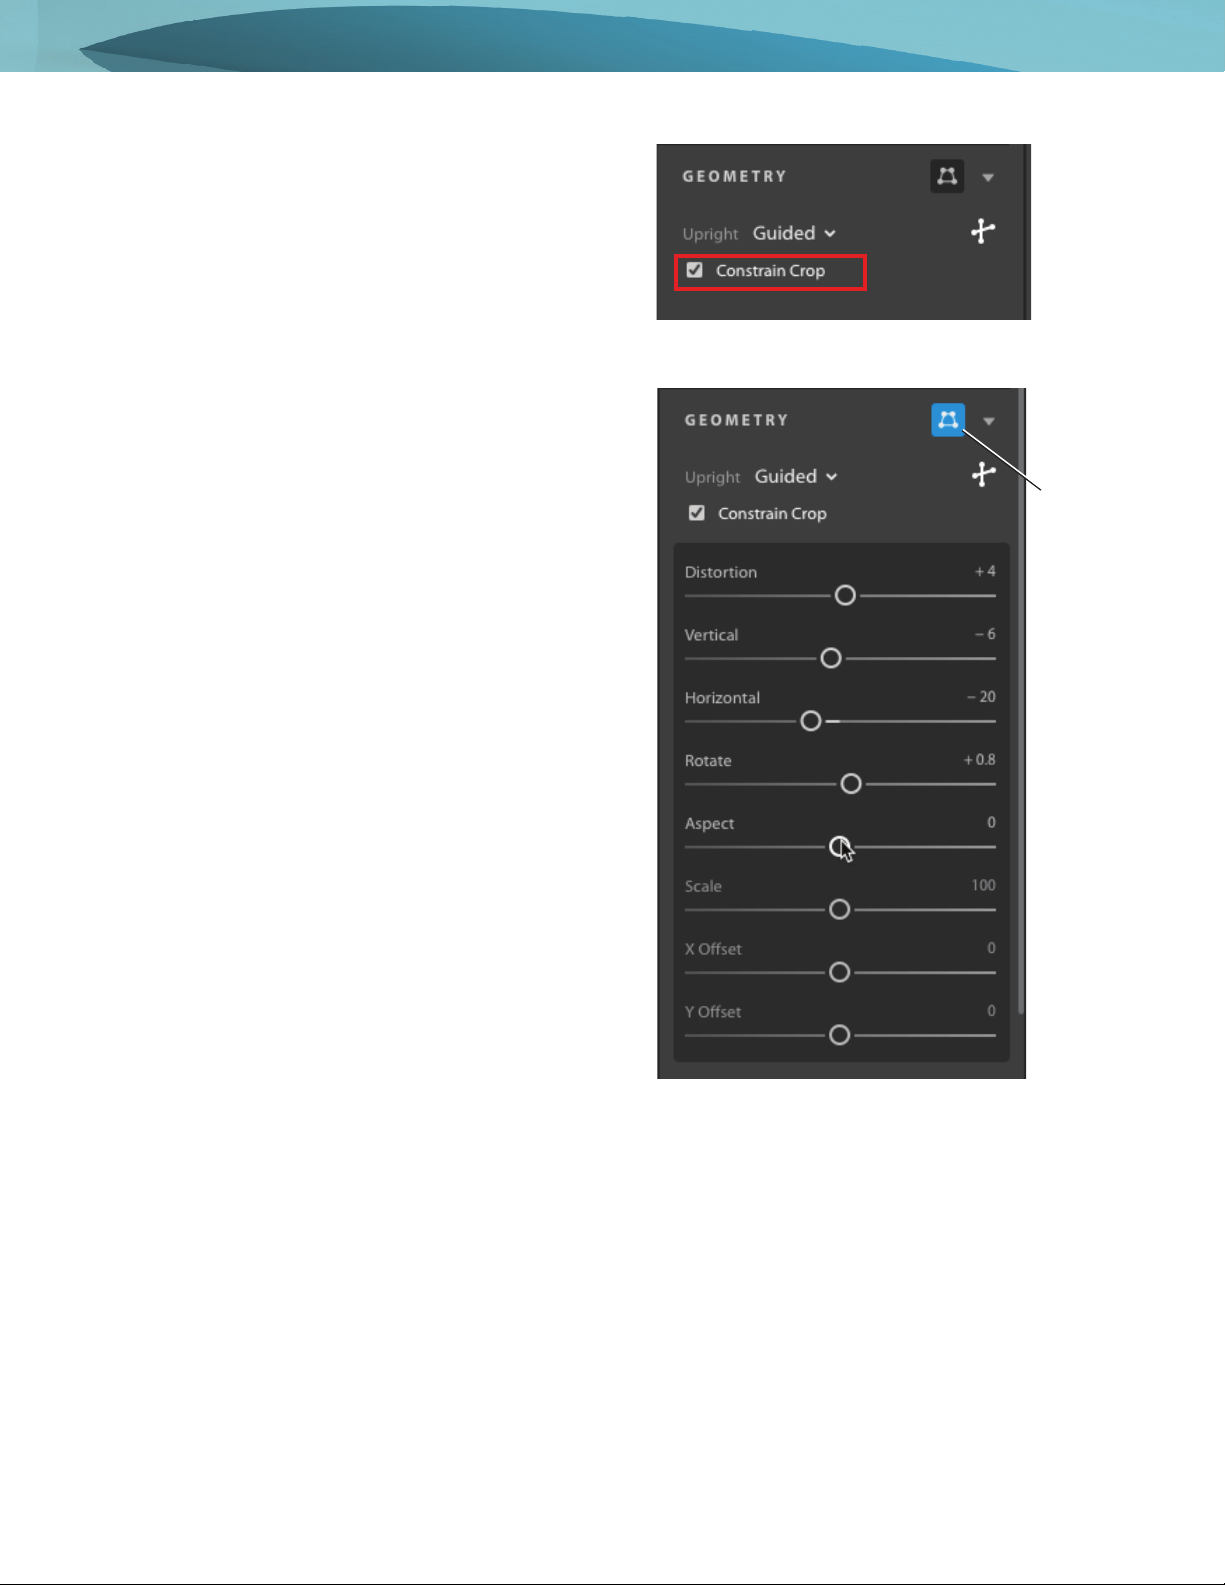
5. (Optional) When correcting the perspective of a
photo, you may get white areas near the image
boundaries. To prevent this, select the Constrain Crop
option to automatically crop the photo according to
the original dimension (Figure 16).
6. Use Manual Transforms to ne-tune the perspective
corrections - Distortion, Vertical, Horizontal, Rotate,
Aspect, Scale, X Oset, Y Oset (Figure 17).
Figure 16 Edit controls panel, Geometry settings
Figure 17 Edit controls panel, Geometry settings with
Manual Transforms
Manual
Transforms
icon
14
Edit and organize photos with Lightroom CC
© 2018 Adobe Systems Incorporated.
is document requires Adobe Lightroom CC 1.1. Technical instructions may dier depending on your version.
Organize your photos
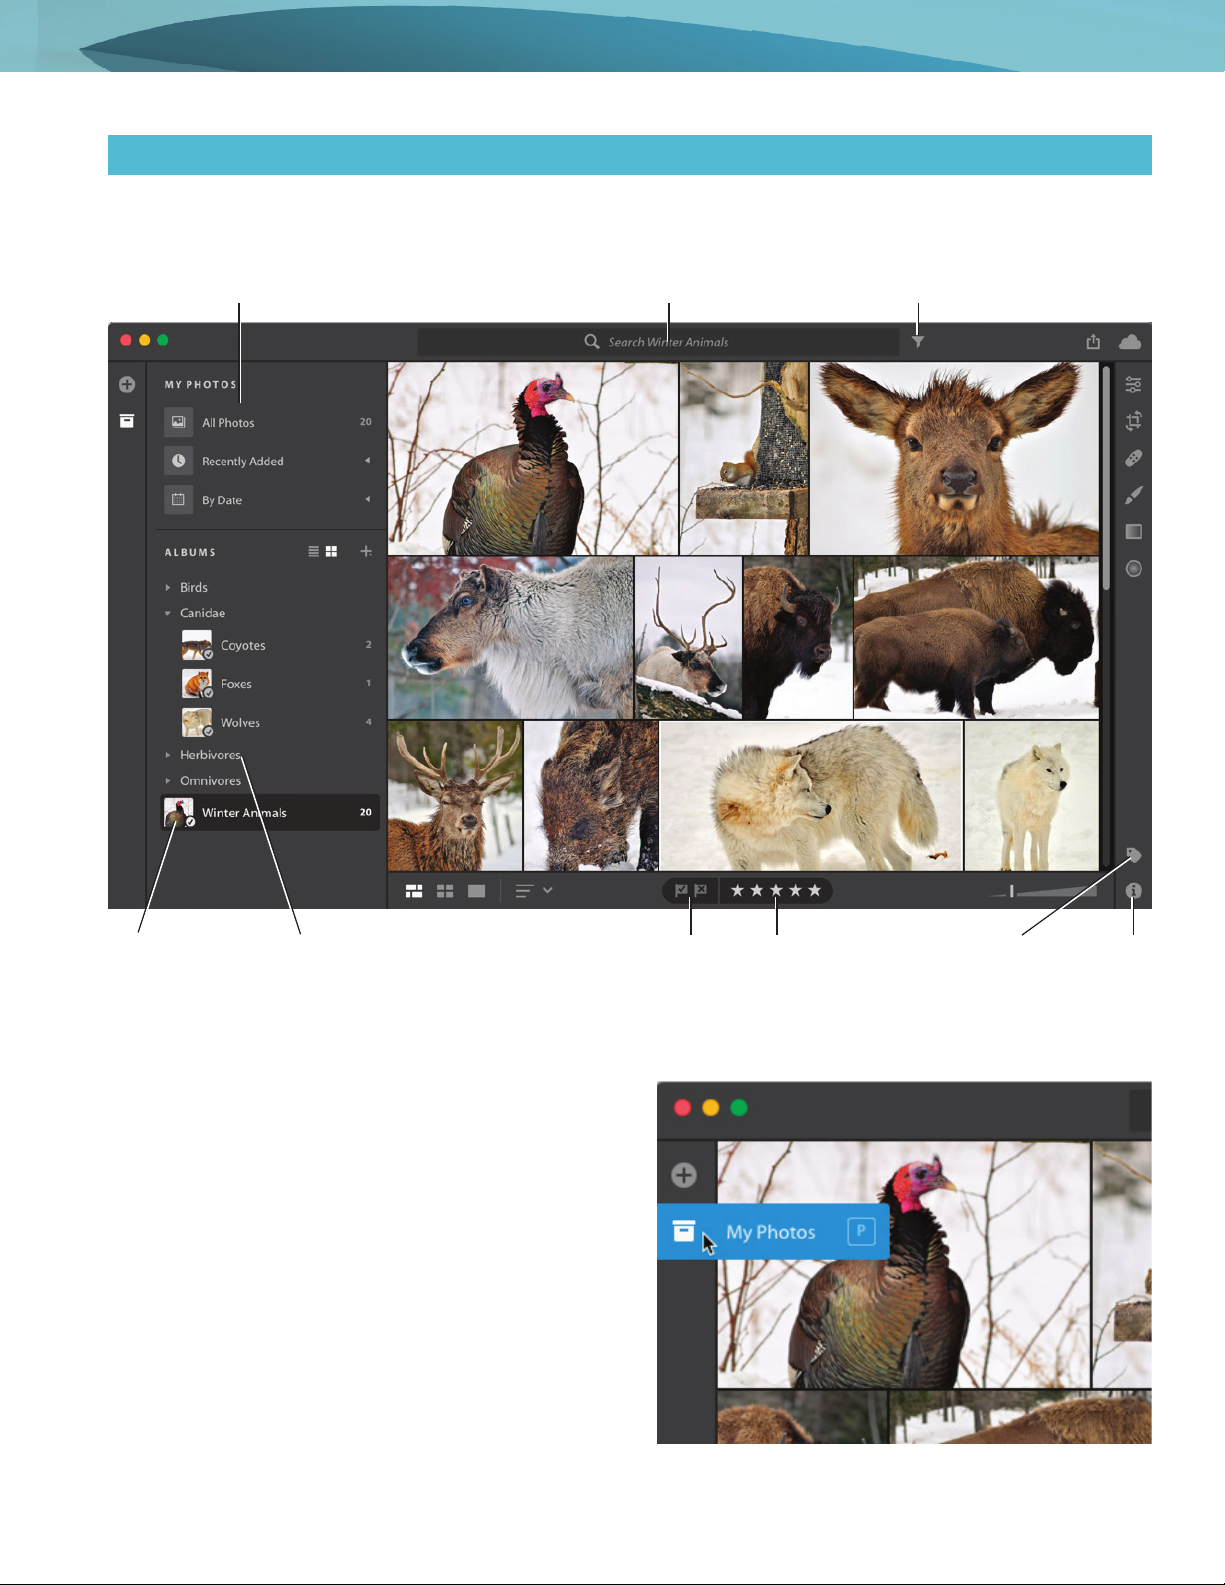
Lightroom CC offers many ways to organize and find your photos (Figure 18). You can manage your photos as albums
or stacks; or organize them using keywords, metadata, flags, and ratings. Finding and filtering photos is also easy.
To add your photos to an album or a folder:
1. In Photo Grid view or Square Grid view, select the My
Photos icon to open the My Photos and Albums
panel (Figure 19).
The My Photos and Albums panel opens (Figure 18).
Figure 18 Organize your photos in Lightroom CC
Album Folder
My Photos Search bar Filter
Keywords InfoRatingsFlags
Figure 19 My Photos icon
15
Edit and organize photos with Lightroom CC
© 2018 Adobe Systems Incorporated.
is document requires Adobe Lightroom CC 1.1. Technical instructions may dier depending on your version.
1. In Photo Grid view or Square Grid view, select the
image or images you want to include in the album.
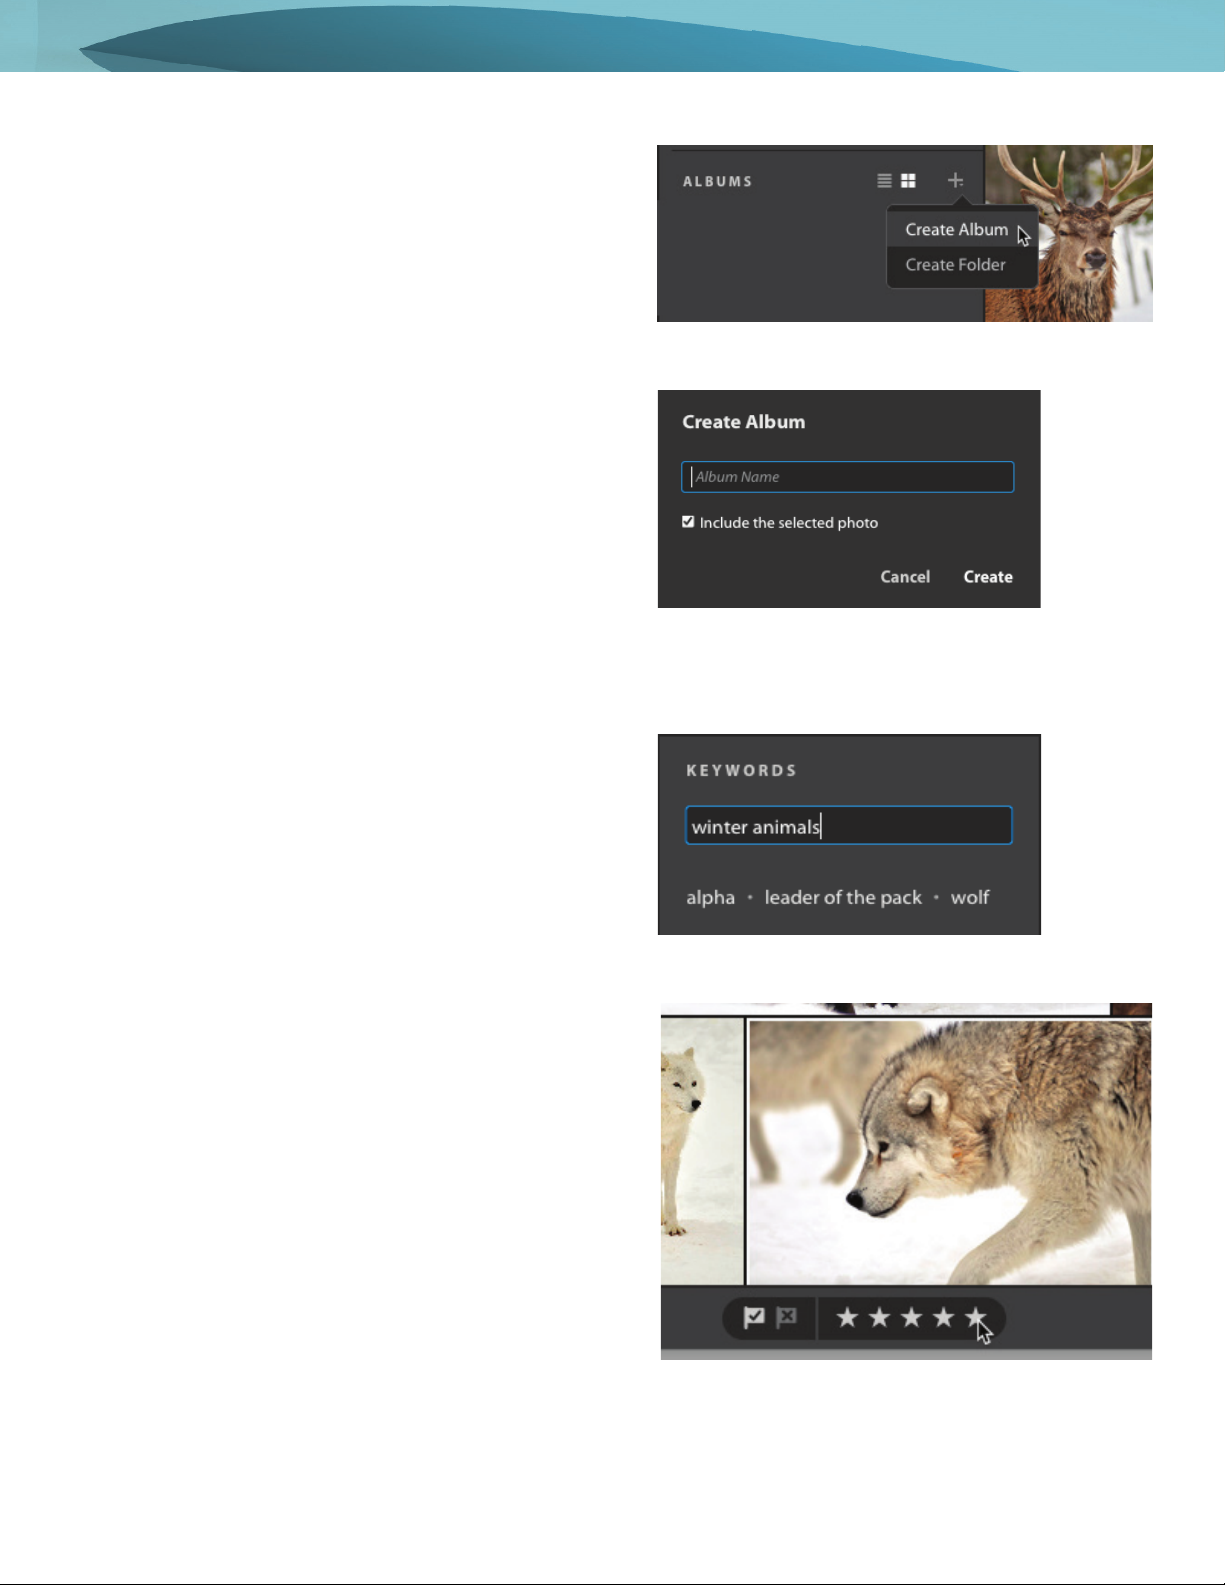
2. In the le pane that opens, click the + icon and then
click Create Album (Figure 20).
3. In the dialog box that opens, enter a name for the
new album and click Create (Figure 21).
4. To add more photos to the album, select photos from
the grid and drag them to the album in the le pane.
5. To organize albums into folders, click the + icon, give
it a name, and then click Create Folder. Lightroom CC
lists the folder in the Albums area.
6. Drag one or more albums under the folder.
7. If necessary, create subfolders and add albums to
them.
To assign keywords, and rate or flag photos:
1. In the Photo Grid or Square Grid view, or in the Detail
view lmstrip, select one or more photos.
2. Click the keywords icon in the lower-le corner of the
screen (Figure 18).
3. In the Keywords panel (Figure 22), assign one or
more keywords to the photos and press Enter (Win-
dows) or Return (Mac OS) to apply.
4. To rate and ag photos, select one or more photos in
the Photo Grid or Square Grid view, or in the Detail
view lmstrip.
5. Click a ag to set photo(s) as a pick, and click the stars
to set a rating for the photo(s) (Figure 23).
Figure 20 Create Album button
Figure 21 Create Album button
Figure 23 Flag and rate photos in the grid area
Figure 22 Keywords panel

16
For more information
Get instant access to free courses, workshops, &
teaching materials and connect with the creative
education community on the Adobe Education
Exchange: https://edex.adobe.com/.
Adobe Systems Incorporated
345 Park Avenue
San Jose, CA 95110-2704
USA
www.adobe.com
Adobe and the Adobe logo are either registered trademarks or
trademarks of Adobe Systems Incorporated in the United States
and/or other countries. All other trademarks are the property of
their respective owners.
© Adobe Systems Incorporated. All rights reserved.
is work is licensed under a Creative Commons Aribution-
Noncommercial-Share Alike . Unported License.
Search and filter photos
Aside from searching photos by metadata and keywords, Lightroom can also find and display photos based on the
objects in them. For example, you can quickly search for all photos that have “flowers” or “cars” in them. Adobe Sensei
is a new and developing tech that uses the power of machine learning to automatically apply searchable keywords. To
learn more about this exciting new technology, please visit Adobe Sensei.
To search photos:
1. In the Search bar, type a search term. For example,
with the Winter Animals collection, you might type
“bison” (Figure 24).
The results are presented in the Photo Grid, Square
Grid view, or in the Detail view.
In this particular case, the keyword “bison” was not
applied to the images but rather was automatically
generated by Adobe Sensei technology.
To filter photos:
1. Click the lter icon next to the Search bar (Figure 25) to quickly lter photos by:
• Ratings Use the star icons to view photos rated at, or higher than, a certain star rating (Figure 25).
• Flags Select agged, rejected, or unagged.
• Keywords Use the drop-down menu to choose from a list of available terms.
• Cameras Filter by camera used to shoot the photos.
• Location Filter by geotags applied to the photos.
Figure 24 Results of keyword search
Figure 25 Filtering photos by star rating
Filter

'